
Introduction to MySQL Administration
MySQL Administration is defined as a program or operation that is used to perform administrative tasks like configuring, monitoring, managing users, and its role, starting and stopping MySQL server with backups and other such admin procedures. The MySQL Administration is intended to work with MySQL 4.0 versions and higher than it also. MySQL Administration guides you on how to start, halt, and resume a MySQL Server on Windows and Linux. MySQL is an open-source RDBMS software under GNU licensed and popularly used with PHP programming and other web applications. MySQL is a Database Management System that works on a server that is fast, secure, and easy to use for both small or huge data application storage and access. MySQL server can accumulate a huge amount of bulky data in the arrangement of MySQL tables which are in the form of related rows and columns. To fetch and manage MySQL data, MySQL Administration uses a standard query language called SQL – Structured Query Language, which plays an important role in manipulating the records or rows of tables in the server. Also, the SQL query helps in organizing all the databases to maintain the server and its data privacy.
What are the roles of MySQL administrator?
- Create Users: It defines how to add new users in the MySQL Server.
- Grant Privileges: It permits rights to the user.
- Revoke Privileges: It withdraws the user privileges from the account.
- Manage Roles: It organizes the different roles assigned to the users and their privileges.
How does MySQL Administration work?
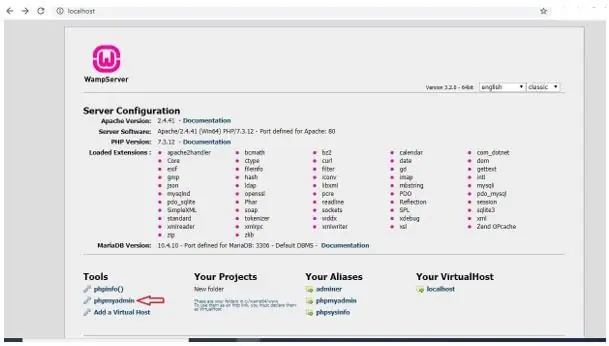
We can install WAMP or XAMPP MySQL servers to use PHPMyAdmin i.e. admin panel of MySQL. PHPMyAdmin is dedicated to handling the administration of MySQL over the web applications which is free software written in PHP.
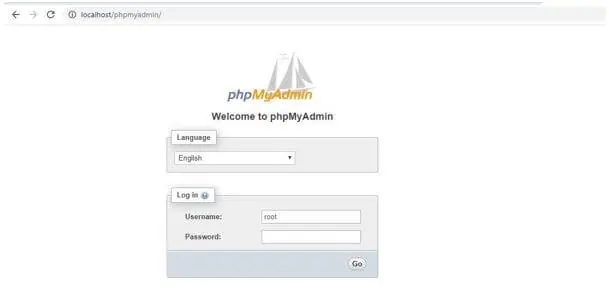
On clicking PHPMyAdmin, we need to use login credentials but by default here, the root is username and password is blank:
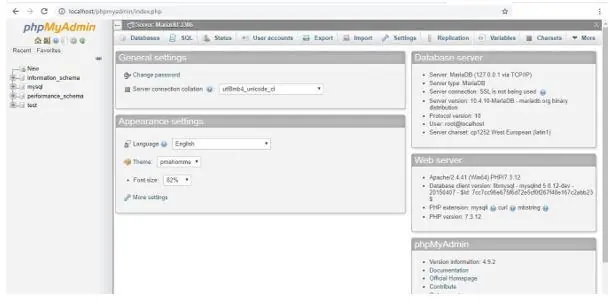
PHPMyAdmin server page:
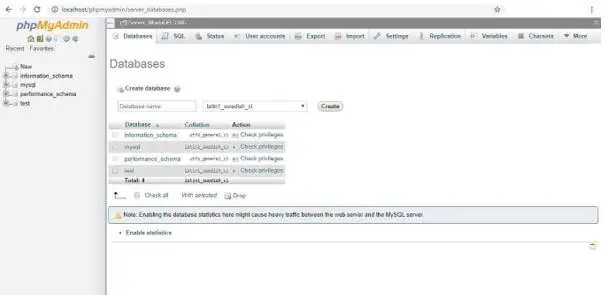
Showing all databases:
MySQL Administration bench allows us to integrate the tools into a simpler and friendly graphical user interface. MySQL DBA enables us to create and manage databases. Using MySQL Commands, we can achieve managing the databases and their records successfully.
We have some commands described below:
- Show Databases: Lists all the databases present in the MySQL Server.
- Show Tables: Displays all the tables stored in a particular MySQL database.
- Show Columns: Shows the list of columns from a specific table in the database server.
- Show Processlist: Finds the currently running processes or threads in the MySQL server.
With these features, DBA also provides some special tools as follows:
- Backup: Using the mysqldump tool, you can take a backup of one or multiple databases.
- Restore: Even, you can restore the database with the dump file.
- Maintain Tables: Responsible to provide commands to preserve the databases in the MySQL server.
How do I become a MySQL database administrator?
There are two main paths to become a database administrator: Focusing on being a DBA from the beginning of an IT career, or (more commonly) starting in a general ICT field, such as helpdesk support or development, and gradually becoming more proficient in database administration.
Running and Shutting down MySQL Server
First check if your MySQL server is running or not. You can use the following command to check it −
ps -ef | grep mysqld
If your MySql is running, then you will see mysqld process listed out in your result. If server is not running, then you can start it by using the following command −
root@host# cd /usr/bin
./safe_mysqld &
Now, if you want to shut down an already running MySQL server, then you can do it by using the following command −
root@host# cd /usr/bin
./mysqladmin -u root -p shutdown
Enter password: ******
Setting Up a MySQL User Account
For adding a new user to MySQL, you just need to add a new entry to the user table in the database mysql.
The following program is an example of adding a new user guest with SELECT, INSERT and UPDATE privileges with the password guest123; the SQL query is −
root@host# mysql -u root -p
Enter password:*******
mysql> use mysql;
Database changed

mysql> INSERT INTO user
   (host, user, password,
   select_priv, insert_priv, update_priv)
   VALUES ('localhost', 'guest',
   PASSWORD('guest123'), 'Y', 'Y', 'Y');
Query OK, 1 row affected (0.20 sec)

mysql> FLUSH PRIVILEGES;
Query OK, 1 row affected (0.01 sec)

mysql> SELECT host, user, password FROM user WHERE user = 'guest';
+-----------+---------+------------------+
|    host   |   user  |     password     |
+-----------+---------+------------------+
| localhost |  guest  | 6f8c114b58f2ce9e |
+-----------+---------+------------------+
1 row in set (0.00 sec)
When adding a new user, remember to encrypt the new password using PASSWORD() function provided by MySQL. As you can see in the above example, the password mypass is encrypted to 6f8c114b58f2ce9e.
Notice the FLUSH PRIVILEGES statement. This tells the server to reload the grant tables. If you don’t use it, then you won’t be able to connect to MySQL using the new user account at least until the server is rebooted.
You can also specify other privileges to a new user by setting the values of following columns in user table to ‘Y’ when executing the INSERT query or you can update them later using UPDATE query.
- Select_priv
- Insert_priv
- Update_priv
- Delete_priv
- Create_priv
- Drop_priv
- Reload_priv
- Shutdown_priv
- Process_priv
- File_priv
- Grant_priv
- References_priv
- Index_priv
- Alter_priv
Another way of adding user account is by using GRANT SQL command. The following example will add user zara with password zara123 for a particular database, which is named as TUTORIALS.
root@host# mysql -u root -p password;
Enter password:*******
mysql> use mysql;
Database changed

mysql> GRANT SELECT,INSERT,UPDATE,DELETE,CREATE,DROP
   -> ON TUTORIALS.*
   -> TO 'zara'@'localhost'
   -> IDENTIFIED BY 'zara123';
This will also create an entry in the MySQL database table called as user.
NOTE − MySQL does not terminate a command until you give a semi colon (;) at the end of the SQL command.
The /etc/my.cnf File Configuration
In most of the cases, you should not touch this file. By default, it will have the following entries −
[mysqld]
datadir = /var/lib/mysql
socket = /var/lib/mysql/mysql.sock

[mysql.server]
user = mysql
basedir = /var/lib

[safe_mysqld]
err-log = /var/log/mysqld.log
pid-file = /var/run/mysqld/mysqld.pid
Here, you can specify a different directory for the error log, otherwise you should not change any entry in this table.
Administrative MySQL Command
Here is the list of the important MySQL commands, which you will use time to time to work with MySQL database −
- USE Databasename − This will be used to select a database in the MySQL workarea.
- SHOW DATABASES − Lists out the databases that are accessible by the MySQL DBMS.
- SHOW TABLES − Shows the tables in the database once a database has been selected with the use command.
- SHOW COLUMNS FROM tablename: Shows the attributes, types of attributes, key information, whether NULL is permitted, defaults, and other information for a table.
- SHOW INDEX FROM tablename − Presents the details of all indexes on the table, including the PRIMARY KEY.
- SHOW TABLE STATUS LIKE tablename\G − Reports details of the MySQL DBMS performance and statistics.

