The recommended way to install MySQL on a Linux system is via RPM. MySQL AB makes the following RPMs available for download on its website −
- MySQL − The MySQL database server manages the databases and tables, controls user access and processes the SQL queries.
- MySQL-client − MySQL client programs, which make it possible to connect to and interact with the server.
- MySQL-devel − Libraries and header files that come in handy when compiling other programs that use MySQL.
- MySQL-shared − Shared libraries for the MySQL client.
- MySQL-bench − Benchmark and performance testing tools for the MySQL database server.
The MySQL RPMs listed here are all built on a SuSE Linux system, but they will usually work on other Linux variants with no difficulty.
Now, you will need to adhere to the steps given below, to proceed with the installation −
- Login to the system using the root user.
- Switch to the directory containing the RPMs.
- Install the MySQL database server by executing the following command. Remember to replace the filename in italics with the file name of your RPM.
[root@host]# rpm -i MySQL-5.0.9-0.i386.rpm
The above command takes care of installing the MySQL server, creating a user of MySQL, creating necessary configuration and starting the MySQL server automatically. You can find all the MySQL related binaries in /usr/bin and /usr/sbin. All the tables and databases will be created in the /var/lib/mysql directory. The following code box has an optional but recommended step to install the remaining RPMs in the same manner −
[root@host]# rpm -i MySQL-client-5.0.9-0.i386.rpm
[root@host]# rpm -i MySQL-devel-5.0.9-0.i386.rpm
[root@host]# rpm -i MySQL-shared-5.0.9-0.i386.rpm
[root@host]# rpm -i MySQL-bench-5.0.9-0.i386.rpm
How to install MySQL?
- Prerequisites.
- Step 1: Go to the official website of MySQL and download the community server edition software. …
- Step 2: Next, there are two options available to download the setup. …
- Step 1: After downloading the setup, unzip it anywhere and double click the MSI installer .exe file.
Why MySQL?
- Open Source – MySQL is open-source software. You don’t have to spend a single penny to access its services.
- Cross-Platform – MySQL can run on Windows, Linux, Unix, and other operating systems.
- High Availability – MySQL possesses a high processing system that makes MySQL process bulk queries and transactions while ensuring unique memory caches.
- Reliability – SSH and SSL provide secure connections in MySQL. MySQL comes with features such as data encryption and data backup for recovery.
Installing MySQL on Windows
The default installation on any version of Windows is now much easier than it used to be, as MySQL now comes neatly packaged with an installer. Simply download the installer package, unzip it anywhere and run the setup.exe file. The default installer setup.exe will walk you through the trivial process and by default will install everything under C:\mysql. Test the server by firing it up from the command prompt the first time. Go to the location of the mysqld server which is probably C:\mysql\bin, and type −
mysqld.exe --console
NOTE − If you are on NT, then you will have to use mysqld-nt.exe instead of mysqld.exe
If all went well, you will see some messages about startup and InnoDB. If not, you may have a permissions issue. Make sure that the directory that holds your data is accessible to whatever user (probably MySQL) the database processes run under. MySQL will not add itself to the start menu, and there is no particularly nice GUI way to stop the server either. Therefore, if you tend to start the server by double clicking the mysqld executable, you should remember to halt the process by hand by using mysqladmin, Task List, Task Manager, or other Windows-specific means.
Verifying MySQL Installation
After MySQL, has been successfully installed, the base tables have been initialized and the server has been started: you can verify that everything is working as it should be via some simple tests.
Use the mysqladmin Utility to Obtain Server Status
Use mysqladmin binary to check the server version. This binary would be available in /usr/bin on linux and in C:\mysql\bin on windows.
[root@host]# mysqladmin --version
It will produce the following result on Linux. It may vary depending on your installation −
mysqladmin Ver 8.23 Distrib 5.0.9-0, for redhat-linux-gnu on i386
If you do not get such a message, then there may be some problem in your installation and you would need some help to fix it.
Execute simple SQL commands using the MySQL Client
You can connect to your MySQL server through the MySQL client and by using the mysql command. At this moment, you do not need to give any password as by default it will be set as blank.
You can just use following command −
[root@host]# mysql
It should be rewarded with a mysql> prompt. Now, you are connected to the MySQL server and you can execute all the SQL commands at the mysql> prompt as follows −
mysql> SHOW DATABASES;
+----------+
| Database |
+----------+
|   mysql  |
|   test   |
+----------+
2 rows in set (0.13 sec)
Post-installation Steps
MySQL ships with a blank password for the root MySQL user. As soon as you have successfully installed the database and the client, you need to set a root password as given in the following code block −
[root@host]# mysqladmin -u root password "new_password";
Now to make a connection to your MySQL server, you would have to use the following command −
[root@host]# mysql -u root -p
Enter password:*******
UNIX users will also want to put your MySQL directory in your PATH, so you won’t have to keep typing out the full path everytime you want to use the command-line client.
For bash, it would be something like −
export PATH = $PATH:/usr/bin:/usr/sbin
Running MySQL at Boot Time
If you want to run the MySQL server at boot time, then make sure you have the following entry in the /etc/rc.local file.
/etc/init.d/mysqld start
Also,you should have the mysqld binary in the /etc/init.d/ directory.
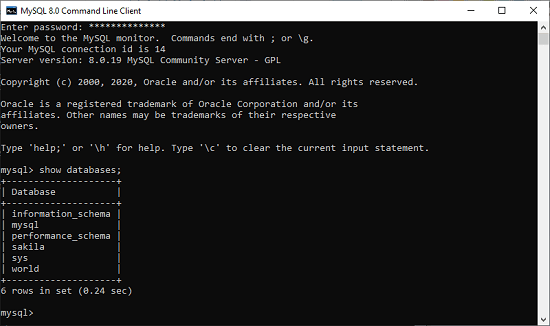
Verify MySQL installation
Once MySQL has been successfully installed, the base tables have been initialized, and the server has been started, you can verify its working via some simple tests. Open your MySQL Command Line Client; it should have appeared with a mysql> prompt. If you have set any password, write your password here. Now, you are connected to the MySQL server, and you can execute all the SQL command at mysql> prompt as follows:
For example: Check the already created databases with show databases command: