
If you are interested to learn about the Working with Rockymongo
Unlike SQL databases, MongoDB does not come with built-in auto-increment capability. The primary key used by default to identify each document uniquely is the 12-byte ObjectId for the _id column. There might be instances, though, where we’d prefer the _id field to contain a different auto-incremented value than the ObjectId.
Since this is not a standard feature in MongoDB, we will use a counters collection, as advised by the MongoDB documentation, to programmatically implement this functionality.
Using Counter Collection
Consider the following products document. We want the _id field to be an auto-incremented integer sequence starting from 1,2,3,4 upto n.
{
  "_id":1,
  "product_name": "Apple iPhone",
  "category": "mobiles"
}
For this, create a counters collection, which will keep track of the last sequence value for all the sequence fields.
>db.createCollection("counters")
Now, we will insert the following document in the counters collection with productid as its key −
> db.counters.insert({
	"_id":"productid",
	"sequence_value": 0
})
WriteResult({ "nInserted" : 1 })
>
The field sequence_value keeps track of the last value of the sequence.
Use the following code to insert this sequence document in the counters collection −
>db.counters.insert({_id:"productid",sequence_value:0})
Creating Javascript Function
The function get Next Sequence Value will now be developed. It will accept the sequence name as an argument, increase the sequence number by 1, and then return the new sequence number. The sequence name in our instance is productid.
>function getNextSequenceValue(sequenceName){
   var sequenceDocument = db.counters.findAndModify({
      query:{_id: sequenceName },
      update: {$inc:{sequence_value:1}},
      new:true
   });
   return sequenceDocument.sequence_value;
}
Using the Javascript Function
Now, while creating a new document, we’ll utilise the function get Next Sequence Value and add the received sequence value to the document’s _id property.
Insert two sample documents using the following code −
>db.products.insert({
   "_id":getNextSequenceValue("productid"),
   "product_name":"Apple iPhone",
   "category":"mobiles"
})
>db.products.insert({
   "_id":getNextSequenceValue("productid"),
   "product_name":"Samsung S3",
   "category":"mobiles"
})
As you can see, we have used the getNextSequenceValue function to set value for the _id field.
To verify the functionality, let us fetch the documents using find command −
>db.products.find()The above query returned the following documents having the auto-incremented _id field −
{ "_id" : 1, "product_name" : "Apple iPhone", "category" : "mobiles"}
{ "_id" : 2, "product_name" : "Samsung S3", "category" : "mobiles" }
Step-by-Step Guide for Auto-Incrementing a Field in MongoDB Atlas Using a JavaScript Function
Using Triggers in MongoDB Atlas, we will put auto-increment functionality into place. Server-side logic can be scheduled to run or executed in response to database events thanks to triggers. Find out more about database triggers.
Create Collections
For this approach, you need at least two collections.The first collection will hold the details of students; hence we will name it students. Run the following command to create a students collection.
db.createCollection("students");The second collection will hold the current unique identifier value for the students. Let’s name it counters. Run the following command to create a counters collection.
db.createCollection("counters");Create Trigger
To implement triggers for auto-increment, log into your MongoDB Atlas account, open the cluster you want to work on. and click on Triggers.
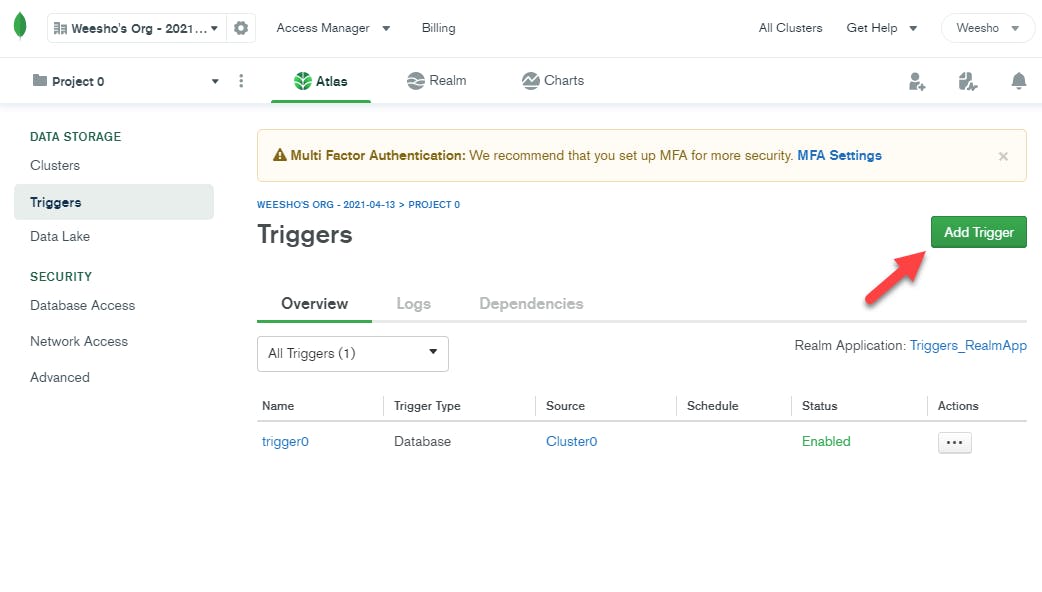
Click on Add Trigger and set the following values to the corresponding fields.
- Trigger Type: Database
- Name : Auto
_Increment_Trigger - Enabled : ON
- Event Overriding : ON
- Link Data Sources(s) : <the clusters and data lakes you like to access>
- Cluster Name : <your cluster name>
- Database Name : <your database name>
- Collection Name : students
- Operation Type : Insert
- Full Document : ON
- Select An Event Type : Function
In the Function field, add the following code.
exports = async function(changeEvent) {
    var docId = changeEvent.fullDocument._id;

    const countercollection = context.services.get("<ATLAS-CLUSTER>").db(changeEvent.ns.db).collection("counters");
    const studentcollection = context.services.get("<ATLAS-CLUSTER>").db(changeEvent.ns.db).collection(changeEvent.ns.coll);

    var counter = await countercollection.findOneAndUpdate({_id: changeEvent.ns },{ $inc: { seq_value: 1 }}, { returnNewDocument: true, upsert : true});
    var updateRes = await studentcollection.updateOne({_id : docId},{ $set : {studentId : counter.seq_value}});

    console.log(`Updated ${JSON.stringify(changeEvent.ns)} with counter ${counter.seq_value} result : ${JSON.stringify(updateRes)}`);
};- Replace
<ATLAS-CLUSTER>with your cluster service name.
Your code should look like this.
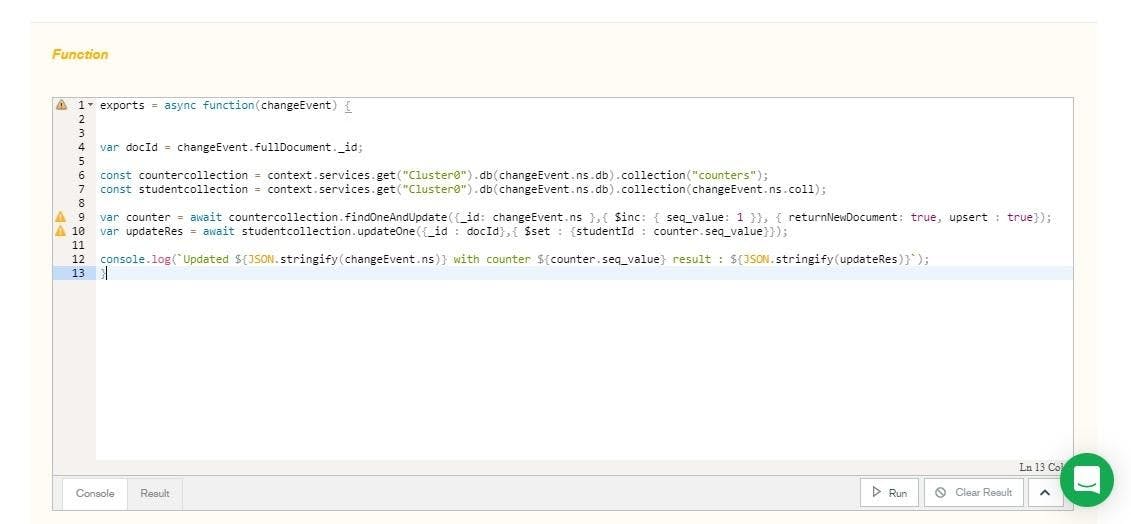
Click Save to save the trigger.
Run Trigger
In the code above, we first defined an insert event trigger for the students collection and initialised the counters collection. The trigger function runs when a document is inserted into the students collection, updating the seq value field in the counters collection and adding the seq value as the studentId field in the students collection.
With the mongodb inc operator, a field is increased by the supplied amount (1 in our case). While the upsert parameter, when set to true, creates a new studentId counter if the current namespace doesn’t already have one, the returnNewDocument parameter, when set to true, atomically returns an incremented number.
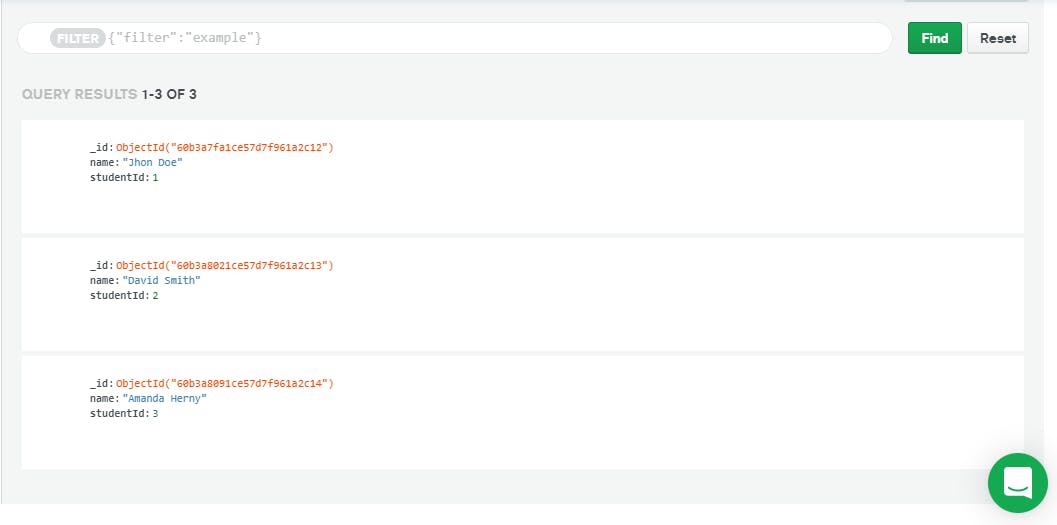
To see the trigger in action, run the following commands to insert a few documents into the students collection.
db.students.insert({
   "name":"Jhon Doe"
});
db.students.insert({
"name":"David Smith"
});db.students.insert({
"name":"Amanda Herny"
});Run the following code to ensure the results are consistent.
db.students.find().pretty();
Once the code execution is complete, you will get the following results.
{
        "_id" : ObjectId("60b3a7fa1ce57d7f961a2c12"),
        "name" : "Jhon Doe",
        "studentId" : NumberLong(1)
}
{
        "_id" : ObjectId("60b3a8021ce57d7f961a2c13"),
        "name" : "David Smith",
        "studentId" : NumberLong(2)
}
{
        "_id" : ObjectId("60b3a8091ce57d7f961a2c14"),
        "name" : "Amanda Herny",
        "studentId" : NumberLong(3)
}
You can also view the results graphically in MongoDB Atlas by traversing to the students collection.
To check the document in the counters collection, run the following code.
db.counters.find().pretty();
You will get the following results.
{ "_id" : ObjectId("60b39cf75886657cb75527bb"), "seq_value" : "0" }
{
        "_id" : {
                "db" : "myFirstDatabase",
                "coll" : "students"
        },
        "seq_value" : NumberLong(3)
}
Notice the value of seq_value field in the counters collection. It has increased to 3 from 0, as we have inserted 3 documents into the students collection.

