
Amazon Web Services (AWS) is a comprehensive cloud computing platform, provided by Amazon. It provides abroad set of infrastructure as a service (IaaS), platform as a service (PaaS) and packaged software as a service (SaaS) offerings. For further detail on AWS, you can go to amazon’s official website.
Here am going to discuss, how we can install our own Gitlab server on AWS instance, with public ip address share by AWS. If you want to access it on domain, you can configure domain with AWS instance.
Follow steps to install Gitlab on AWS instance Ubutnu
First of all, login to you aws amazon account. And start your new install, am using Ubuntu 16 bit operation system to install it.

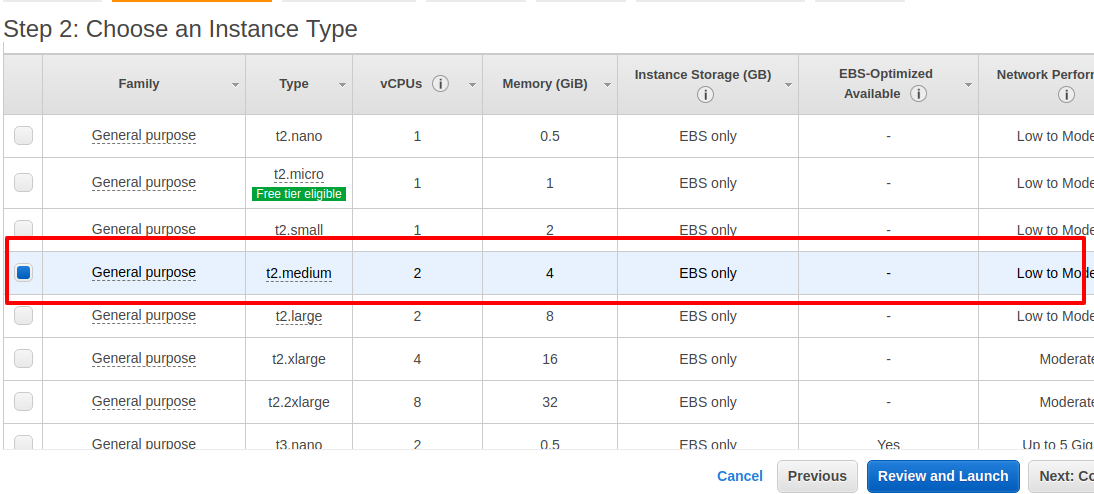
Choose medium type aws instance of Ubutnu.
Click on Next, Next configuration button of AWS console, No special configuration required here. Only one important thing, we have configure is Security Group. In Security Group add rule of HTTP and HTTPS, so that we can access over Gitlab server on browser, also download your private key .pem file, that so we can access AWS instance over SSH. After you added security group for HTTP and HTTPS, click on Review and Launch button.
![]()
If everything going well then make you are able to find Public DNS (IPv4) IP address on instance list page.
Login to AWS instance with recently downloaded .pem key file. Here is command that you can use to connect over ssh.
ssh -i instance-name.pem ubuntu@{public-ip-address}If you are getting file permission issue then you have to change .pem file permission to 400.
sudo chmod 400 /path/instance-name.pem
Follow the steps to install Gitlab Server on AWS, if you successfully logged into AWS instance.
- Gitlab has already well documented all the steps to install Gitlab Server on Ubuntu. You can follow from here
- First of all update and install all dependencies for Gitlab Server
sudo apt-get update

sudo apt-get install -y curl openssh-server ca-certificates
- You can install Postfix to send notification mails, if you want to go with some other solution, you can skip this step.
sudo apt-get install -y postfix
- During Postfix installation a configuration screen may appear. Select ‘Internet Site’ and press enter. Use your server’s external DNS for ‘mail name’ and press enter. If additional screens appear, continue to press enter to accept the defaults.
- Add the GitLab package repository and install the package
curl https://packages.gitlab.com/install/repositories/gitlab/gitlab-ee/script.deb.sh | sudo bash
- Next, install the GitLab package. Change `http://gitlab.example.com` to the URL at which you want to access your GitLab instance. Installation will automatically configure and start GitLab at that URL. HTTPS requires additional configuration after installation.
sudo EXTERNAL_URL="http://gitlab.example.com" apt-get install gitlab-ee
- Browse to the hostname and login
- On your first visit, you’ll be redirected to a password reset screen. Provide the password for the initial administrator account and you will be redirected back to the login screen. Use the default account’s username
rootto login. - See our documentation for detailed instructions on installing and configuration.
- On your first visit, you’ll be redirected to a password reset screen. Provide the password for the initial administrator account and you will be redirected back to the login screen. Use the default account’s username
- Set up your communication preferences
- Visit our email subscription preference center to let us know when to communicate with you. We have an explicit email opt-in policy so you have complete control over what and how often we send you emails.Twice a month, we send out the GitLab news you need to know, including new features, integrations, docs, and behind the scenes stories from our dev teams. For critical security updates related to bugs and system performance, sign up for our dedicated security newsletter.

